Spring BootでCircuit Breaker(Spring Cloud Netflix Hystrix)を試してみたメモです。
(2017/1/12 dependencyを修正)
---
Spring BootでCircuit Breakerを試してみました。
マイクロサービスでAPI通信しているときに、一部で通信エラーが発生した場合に
アクセスを遮断して切り離す必要があります。
その際に用いられるのがサーキットブレイカーです。
サーキットブレイカーパターンの詳しい説明はこちらにあります。
martinfowler.com
Netflix Hystrixはフォールトトレランス(障害が起きてもサービスを継続する)のためのライブラリで、
サーキットブレイカーの実装が含まれています。
github.com
Spring BootでSpring Cloud NetflixのHystrixを試してみました。
Spring Cloud Netflix
dependency
dependencyにはspring-cloud-starter-hystrixを追加しました。
dependencyManagementを設定し、release trainに現時点の安定版のCamden.SR3を指定しました。
これでspring cloudの依存関係は適切なバージョンで解決されます。
pom.xml
<dependencyManagement>
    <dependencies>
        <dependency>
            <groupId>org.springframework.cloud</groupId>
            <artifactId>spring-cloud-dependencies</artifactId>
            <version>Camden.SR3</version>
            <type>pom</type>
            <scope>import</scope>
        </dependency>
    </dependencies>
</dependencyManagement>
<dependency>
    <groupId>org.springframework.cloud</groupId>
    <artifactId>spring-cloud-starter-hystrix</artifactId>
</dependency>
確認用アプリケーション
自分のサービス(MyApp)から外部サービス(Supplier)にAPIで文字列を取得するサンプルコードを書きました。
自分のサービス(MyApp)
MyAppController.java
@RestController
public class MyAppController {
    @RequestMapping(value = "myapp", method = RequestMethod.GET)
    public String myApp() {
        RestTemplate restTemplate = new RestTemplate();
        URI uri = URI.create("http://localhost:8888/supplier/text");

        return restTemplate.getForObject(uri, String.class);
    }
}
port:8080で起動。
application.properties
server.port=8080
外部サービス(Supplier)
SupplierController.java
@RestController
public class SupplierController {
    @RequestMapping(value = "supplier/text", method = RequestMethod.GET)
    public String replyTest() {
        return "Supplier reply text";
    }
}
port:8888で起動。
application.properties
server.port=8888
両方起動して、curlでMyAppにアクセスしてみます。
$ curl http://localhost:8080/myapp
Reply supplier text
きちんとSupplierから文字列が返ってきてます。
Supplierの方を停止してみます。
この状態でcurlでMyAppにアクセスしてみます。
$ curl http://localhost:8080/myapp
{"timestamp":1483609186065,"status":500,"error":"Internal Server Error","exception":"org.springframework.web.client.ResourceAccessException","message":"I/O error on GET request for \"http://localhost:8888/supplier/text\": Connection refused: connect; nested exception is java.net.ConnectException: Connection refused: connect","path":"/myapp"}
500エラーが返って来ました。
Fallback
Hystrixではフォールバックメソッドを設定可能です。
メソッド呼び出しが失敗して閾値に達した場合、フォールバックメソッドを呼び出します。
フォールバックメソッドを設定するには@HystrixCommandを設定し、フォールバックするメソッドを文字列で指定します。
@HystrixCommand(fallbackMethod = "fallbackText")
public String getSupplierText() {
    URI uri = URI.create("http://localhost:8888/supplier/text");

    return restTemplate.getForObject(uri, String.class);
}

public String fallbackText() {
    return "Reply fallback text";
}
ただし、@HystrixCommandは@Componentまたは@Serviceが設定されたクラスでのみ動作するため、
下記のように、APIコールのメソッドをサービスクラスに切り出します。
MyAppService.java
@Service
public class MyAppService {
    private final RestTemplate restTemplate;

    public MyAppService(RestTemplateBuilder restTemplateBuilder) {
        this.restTemplate = restTemplateBuilder.build();
    }

    @HystrixCommand(fallbackMethod = "fallbackText")
    public String getSupplierText() {
        URI uri = URI.create("http://localhost:8888/supplier/text");

        return restTemplate.getForObject(uri, String.class);
    }

    public String fallbackText() {
        return "Reply fallback text";
    }
}
それにともなって、コントローラー側もサービスクラスを呼ぶように変更。
さらに@EnableCircuitBreakerを付与することで、サーキットブレイカーを有効にします。
MyAppController.java
@EnableCircuitBreaker
@RestController
public class MyAppController {
    private final MyAppService myAppService;

    public MyAppController(MyAppService myAppService) {
        this.myAppService = myAppService;
    }

    @RequestMapping(value = "myapp", method = RequestMethod.GET)
    public String myApp() {
        return myAppService.getSupplierText();
    }
}
先程と同じように両方起動して、curlでMyAppにアクセスしてみます。
$ curl http://localhost:8080/myapp
Reply supplier text
きちんとSupplierから文字列が返ってきてます。
Supplierの方を停止してみます。
この状態でcurlでMyAppにアクセスしてみます。
$ curl http://localhost:8080/myapp
Reply fallback text
そうすると設定したフォールバックメソッドが実行され、フォールバックメソッドで返している文字列が返って来ていることがわかります。
Circuit Breaker
フォールバックされることが確認できたので、
APIコールが遮断されること(サーキットがオープンになること)を確認してみます。
@HystrixCommandのcommandPropertiesで各設定が出来るので、設定値について確認してみます。
circuitBreaker.enabled
サーキットブレイカーを有効にするかどうかの設定。デフォルトは有効。
circuitBreaker.requestVolumeThreshold
サーキットがオープンになるエラー回数。デフォルトは20。
(Hystrixではローリングウィンドウで状態を管理しており、そのローリングウィンドウ内でのエラー回数)
@HystrixCommand(
        fallbackMethod = "fallbackText",
        commandProperties = {
                @HystrixProperty(name = "circuitBreaker.enabled", value = "true"),
                @HystrixProperty(name = "circuitBreaker.requestVolumeThreshold", value = "5")
        }
)
public String getSupplierTextWithThreshold() {
    URI uri = URI.create("http://localhost:8888/supplier/text");
    LocalDateTime now = LocalDateTime.now();
    System.out.println(now + ": api called");
    return restTemplate.getForObject(uri, String.class);
}
APIを6回コールすると、5回めまではsupplierのAPIをコールしてますが、6回目からはしていません。
2017-01-04T18:12:27.738: api called
2017-01-04T18:12:29.815: api called
2017-01-04T18:12:31.833: api called
2017-01-04T18:12:33.861: api called
2017-01-04T18:12:35.888: api called
テストコード
@Test
public void withThreshold() throws InterruptedException {
    restTemplate = new TestRestTemplate();
    URI uri = URI.create("http://localhost:8080/myapp_with_threshold");

    for(int i = 0; i < 6; i++) {
        Thread.sleep(1000);
        restTemplate.getForObject(uri, String.class);
    }
}
circuitBreaker.sleepWindowInMilliseconds
サーキットがオープンした後、sleepWindowInMilliseconds待って再度リクエストを受け付けます。デフォルトは5,000msec。
再度受け付けたリクエストが失敗した場合オープンの状態のままとなり、
リクエストが成功した場合はサーキットがクローズします。
5000msecを指定して確認してみます。
@HystrixCommand(
        fallbackMethod = "fallbackText",
        commandProperties = {
                @HystrixProperty(name = "circuitBreaker.enabled", value = "true"),
                @HystrixProperty(name = "circuitBreaker.requestVolumeThreshold", value = "5"),
                @HystrixProperty(name = "circuitBreaker.sleepWindowInMilliseconds", value = "5000")
        }
)
public String getSupplierTextWithSleepWindow() {
    URI uri = URI.create("http://localhost:8888/supplier/text");
    LocalDateTime now = LocalDateTime.now();
    System.out.println(now + ": api called");
    return restTemplate.getForObject(uri, String.class);
}
連続でリクエストしてみます。
五回目のリクエスト失敗でサーキットがオープンになり、その後は5秒経過ごとに再度api callしています。
5秒ごとのapi callの結果が失敗の場合、サーキットはオープンのままです。
途中から(21:07:51から)はapi callが成功したためサーキットがクローズとなり、再び連続でリクエストを受け付けています。
2017-01-04T21:07:17.318: api called
2017-01-04T21:07:18.884: api called
2017-01-04T21:07:20.413: api called
2017-01-04T21:07:21.938: api called
2017-01-04T21:07:23.486: api called
2017-01-04T21:07:30.153: api called
2017-01-04T21:07:35.273: api called
2017-01-04T21:07:40.489: api called
2017-01-04T21:07:45.798: api called
2017-01-04T21:07:51.207: api called
2017-01-04T21:07:51.920: api called
2017-01-04T21:07:52.450: api called
2017-01-04T21:07:52.975: api called
2017-01-04T21:07:53.507: api called
テストコード
@Test
public void withSleepWindow() throws InterruptedException {
    restTemplate = new TestRestTemplate();
    URI uri = URI.create("http://localhost:8080/myapp_with_sleep_window");

    for(int i = 0; i < 300; i++) {
        Thread.sleep(500);
        restTemplate.getForObject(uri, String.class);
    }
}
circuitBreaker.errorThresholdPercentage
サーキットがオープンになるエラーパーセンテージ。デフォルトは50%。
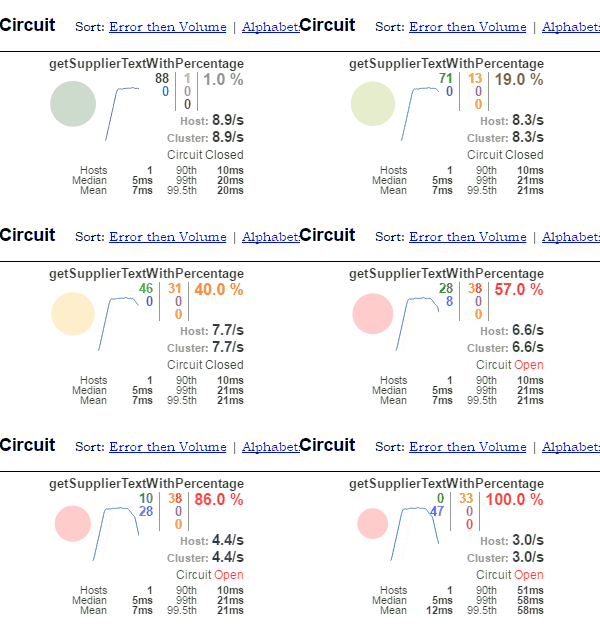
Hystrix Dashboardで50%以上になった時にサーキットがオープンになるのを見てみます。
(Hystrix Dashboardを有効にする方法は記事下部を参照)
@HystrixCommand(
        fallbackMethod = "fallbackText",
        commandProperties = {
                @HystrixProperty(name = "execution.timeout.enabled", value = "true"),
                @HystrixProperty(name = "execution.isolation.thread.timeoutInMilliseconds", value = "50"),
                @HystrixProperty(name = "circuitBreaker.enabled", value = "true"),
                @HystrixProperty(name = "circuitBreaker.errorThresholdPercentage", value = "50")
        }
)
public String getSupplierTextWithPercentage() {
    URI uri = URI.create("http://localhost:8888/supplier/text");
    LocalDateTime now = LocalDateTime.now();
    System.out.println(now + ": api called");
    return restTemplate.getForObject(uri, String.class);
}
両方起動しておいて、途中でSupplierの方を停止してみます。
Hystrix Dashboardを見てみると、エラー率が50%になった時にサーキットがオープンになっているのがわかります。

テストコード
@Test
public void withPercentage() throws InterruptedException {
    restTemplate = new TestRestTemplate();
    URI uri = URI.create("http://localhost:8080/myapp_with_percentage");

    for(int i = 0; i < 10000000; i++) {
        Thread.sleep(100);
        String text = restTemplate.getForObject(uri, String.class);
        System.out.println(i + " : " + text);
    }
}
Hystrix Dashboard
Hystrix DashboardはリアルタイムでHystrixメトリックを監視できるダッシュボードです。
Hystrix Dashboardを利用するには、spring-cloud-starter-hystrix-dashboardをdependencyに追加して、
spring-boot-starter-actuatorを有効にします。
pom.xml
<dependency>
    <groupId>org.springframework.cloud</groupId>
    <artifactId>spring-cloud-starter-hystrix-dashboard</artifactId>
</dependency>
<dependency>
    <groupId>org.springframework.boot</groupId>
    <artifactId>spring-boot-starter-actuator</artifactId>
</dependency>
SpringBootのmainクラスに@EnableHystrixDashboardをつけます。
CircuitBreakerExampleApplication.java
@EnableHystrixDashboard
@SpringBootApplication
public class CircuitBreakerExampleApplication {

	public static void main(String[] args) {
		SpringApplication.run(CircuitBreakerExampleApplication.class, args);
	}
}
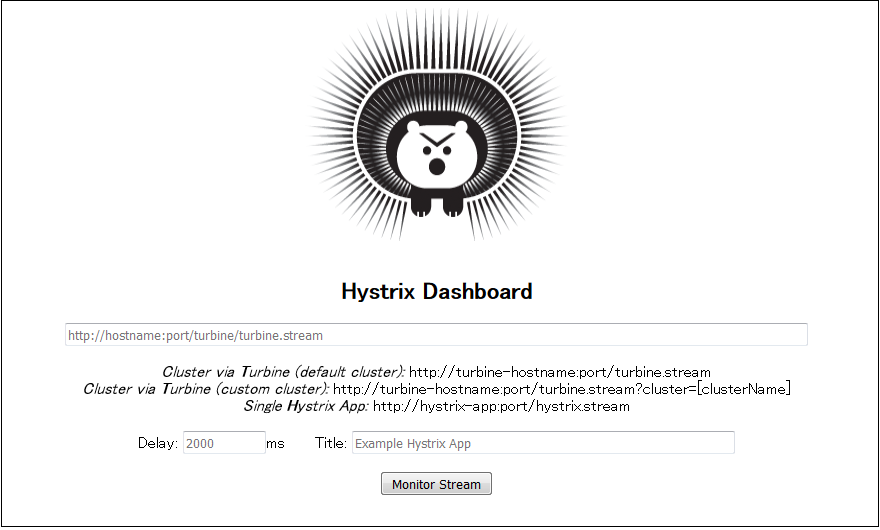
あとは、アプリケーションを起動して、http://localhost:8080/hystrix にアクセスします。
すると、下記の様な画面が出てきます。

hystrix clientのアプリケーションの場合、http://hystrix-app:port/hystrix.stream がエンドポイントになっているので、
http://localhost:8080/hystrix.stream を指定して「Monitor Stream」をクリックします。
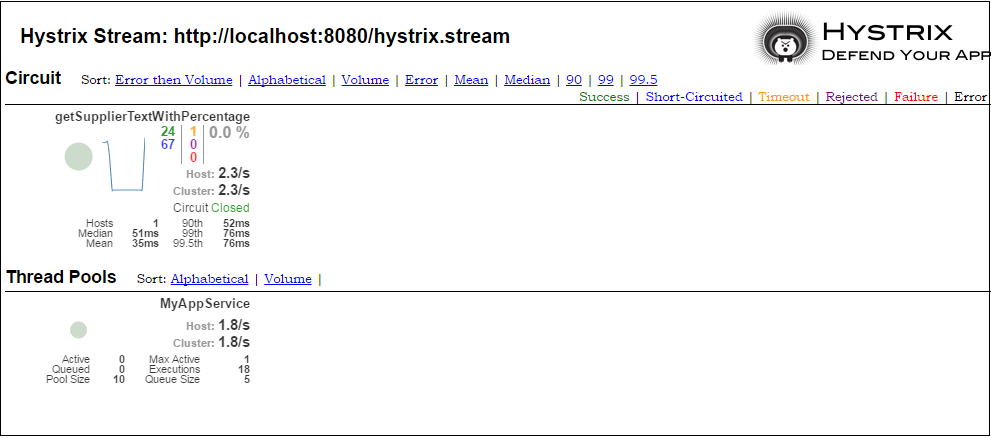
すると下記のようなダッシュボードが表示されます。

各表示項目の説明は下記に載っています。
https://github.com/Netflix/Hystrix/wiki/Dashboard

ソースは下記にあげときました。
spring_examples/circuit-breaker-example at master · pppurple/spring_examples · GitHub
spring_examples/circuit-breaker-supplier-example at master · pppurple/spring_examples · GitHub
終わり。
----
追記
@makingさんに指摘をもらったのでdependency修正しました。
@smokin_wes 👍
— Toshiaki Maki (@making) 2017年1月12日
dependencyの指定はversion決め打ちよりもdependencyManagemnetにrelease train(Camden.SRとか3)指定する方が安定版の組み合わせ使えます。https://t.co/SU0QQFrCdO
